

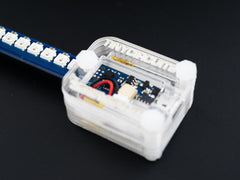
Defend the galaxy with the new TinySaber! Built around the ATtiny841 microcontroller, this product features sixteen vibrant SK6812miniRGB LEDs, capacitive touch sensors, an accelerometer, and a micro-USB port for battery charging and device programming. You can use the touch sensors to turn the device on and off, change color patterns, and even display Persistence-Of-Vision (POV) text! A double tap can change the base color of the TinySaber to red, green, or blue.
The ATtiny841 is reprogrammable, so you'll be able to customize your TinySaber experience with some basic coding knowledge. You can display your own POV text or make custom color patterns! We will be releasing a tutorial soon with more information on how to reprogram your TinySaber.

TECHNICAL DETAILS
ATtiny841
- 8 KB Flash Memory
- 512 KB SRAM and EEPROM
- Voltage: 1.7V - 5.5V
SK6812mini
- Programmable RGB 3-in-1
- 256 level grayscale, 24-bit for RGB
- 800 Kbps transfer rate
Dimensions (Without Handle)
- 10mm x 107mm (.394 inches x 4.21 in)
- Max Height (from the bottom of the board to top of battery connector): 4.60mm (.181 inches)
- Weight: 4.5 grams (.195 ounces)
Dimensions (With Handle)
- Handle Width: 26mm (1.02 inches)
- Length w/Handle: 113.1mm (4.45 inches)
- Height of handle: 13.1mm (.516 inches)
NOTES
- The TinySaber features a reprogrammable microcontroller, however we have not yet released the documentation detailing the process. We will be uploading this to our website in the near future!
- Battery life varies depending on which mode the TinySaber is in during use- typically about an hour.
- The device still uses power while in Standby (i.e. you've swiped down, all lights are off) so it may need to be recharged before use.
ASSEMBLY
Follow the instructions and pictures below to assemble your TinySaber.

Materials:
- Eight (8) acrylic handle pieces
- Three (3) plastic screws
- Three (3) plastic nuts
- One (1) 150 mAH battery
- One (1) TinySaber circuit board
1. Place the three screws, ends facing up, into piece #1. The engraved number should be facing you.

2. Place piece #2, #3, and #4 on the stack. The result should look as below.

3. Place the battery in the depression, with the wires facing up and to the left of the battery. Add piece #5 to the stack to secure it. Be sure not to pinch the battery wires!

4. Thread the top screw through the hole in the TinySaber board and add it to the stack. Plug the battery in, curving the wires toward the center of the board.

5. Make sure the board is resting flat in piece #5 and add piece #6 to secure it.

6. Add piece #7, then the top piece. Hand-tighten the nuts onto the screws.

Follow the instructions on the image below to use your Tiny Saber:

TINYSABER REPROGRAMMING - A HOW-TO GUIDE
TINYSABER
- Brand:: TinyCircuits
- Product Code: :TinyC-Saber
- Reward Points: :23
- Availability: :In Stock
-
रo 2,370.53
- Price in reward points: 2370
-
- 5 or more रo 2,349.47
- 10 or more रo 2,329.47
- 30 or more रo 2,309.47
Related Products

TinyScreen Basic Kit
This TinyScreen Basic Kit has the bare essentials to get going with the TinyDuino with the OLED Tiny..
रo 5,694.73

Tiny Arcade
The Tiny Arcade lets you relive the golden age of video games with an arcade cabinet that fits in th..
रo 3,989.47
Tags: Tinycircuits, TINYSABER